Photoshop Secrets for Preparing Your Product Images
Revolutionize Your Product Shots: Photoshop Tips and Tricks
Optimizing Your Product Images with Photoshop for Kickflip Customizer
This comprehensive guide takes you through essential steps to effectively prepare your product images for use with the Kickflip customizer using Photoshop.
Whether you're a seasoned designer or just starting out, these instructions will assist you in creating the perfect product images to enhance your Kickflip experience.
If you encounter any challenges along the way, we suggest seeking assistance from our expert artwork partners or exploring the services of skilled graphic artists on platforms such as Fiverr, Upwork, or PeoplePerHour.
Preparing Your Project File in Photoshop
Streamline your workflow with these steps to ensure consistency in image size and alignment:
1. Loading Images:
Open Photoshop and consolidate all your images into a single workfile using the Load Files into Stack script.
File > Scripts > Load Files into Stack
2. Resizing Images:
Maintain uniformity across views by resizing images to the same relative size.
Edit > Transform > Scale
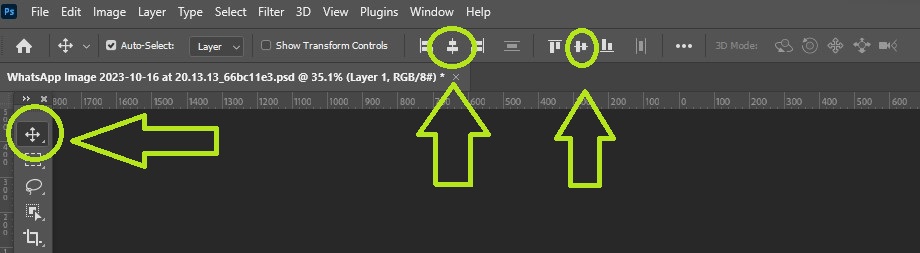
3. Aligning Images:
Prevent any visual discrepancies by aligning images both vertically and horizontally:
Select the Move tool.
Choose all layers with your images.
Click on Align horizontal centers and Align vertical centers.
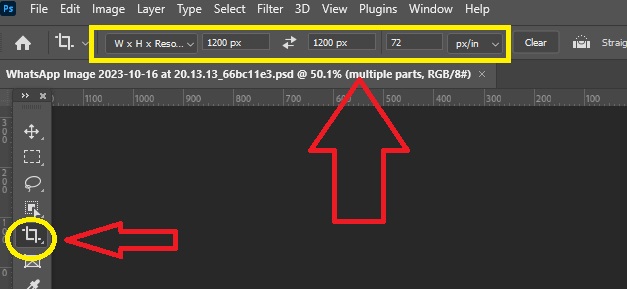
4. Editing Canvas Size:
After sizing and aligning, refine your canvas using the Crop tool. Trim edges, leaving an even border of 1200 to 1200 pixels around your product.
IMPORTANT:
Ensure all product images share the same dimensions, and adjust your canvas size accordingly.
Consistency is key for a polished final product.
This systematic approach will help you maintain precision and visual coherence throughout your project. If you encounter any challenges, don't hesitate to seek further assistance. Thank you for choosing Photoshop for your creative needs.
Precision Product Cutting with the Pen Tool
Achieve detailed product cutouts effortlessly by following these steps:
1. Path Creation:
Utilize the Pen Tool to craft paths around your product. Begin by outlining the exterior shape before meticulously cutting out each part.
2. Save and Name Paths:
Save your paths for future reference and organization. Assign clear, descriptive names to each path.
3. Precision Placement:
Ensure your paths align precisely at the junctions of colors or zones within your product.
4. Convert Path to Selection (Anti-aliased):
Transform your paths into selections with anti-aliasing for smoother transitions.
5. Mask Creation:
Generate a mask using your selection. Fill the mask with either white or black, depending on whether you want to reveal or hide specific areas.
This meticulous process guarantees accurate cutouts and allows for efficient control over the visibility of different product sections.
For optimal results, maintain a keen eye for detail and take advantage of the precision offered by the Pen Tool. If you encounter any challenges, feel free to seek assistance. Happy editing!
Enhancing Cotton Texture for Color Customization
To achieve optimal color customization for your cotton product, follow these steps to make your parts appear white:
1. Desaturation:
Select the layer containing the specific part you want to make white.
Desaturate the selected part to remove color information.
Image > Adjustments > Desaturate
2. Adjusting Brightness, Contrast, and Tonal Range:
Fine-tune the appearance of the part using the Levels adjustment to ensure the whitest possible outcome without sacrificing detail.
Image > Adjustments > Levels
Hint: Desaturate the images effectively to achieve the whitest look possible while preserving intricate details. Inadequate desaturation may impact the final displayed color in the customizer.
3. Saving Images:
Save your images in the transparent PNG format (PNG-24) for optimal color representation.
Ensure images are web-optimized at 72 dpi.
Maintain consistency in size; the recommended image size is 1200 x 1200 pixels.
Note: Larger image sizes may impact customizer performance, especially on mobile devices.


Comments
Post a Comment