Posts

How to Create a Perfect Clipping Path in Photoshop: [ The Ultimate Guide for 2023]

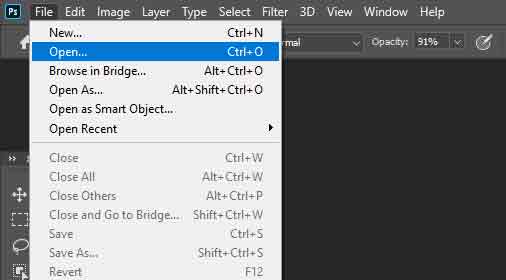
Clipping path is a powerful image editing technique that is widely used in graphic design, photography, and other creative fields. With the help of a clipping path, you can easily remove the background from an image or isolate a specific object. In this guide, we will show you how to create a perfect clipping path in Photoshop, step by step. Step 1: Open the Image in Photoshop The first step is to open the image that you want to edit in Photoshop. Go to File > Open and select the image file from your computer. Step 2: Create a New Path Once you have opened the image, go to the Paths panel and click on the Create New Path button. This will create a new path in the Paths panel. Step 3: Zoom In on the Object To create a perfect clipping path, you need to zoom in on the object you want to isolate. Use the Zoom tool (shortcut: Z) to zoom in on the object. Step 4: Start Creating the Clipping Path Now, select the Pen tool (shortcut: P) and start creating the clipping path around the object

Clipping Path Services for Automotive Photography

Image
  In the world of automotive photography, every detail counts. The smallest imperfection can ruin a shot, and editing can be a nightmare without the proper tools. Clipping path services provide a solution for automotive photographers looking to perfect their images. In this article, we'll explore what clipping path services are and how they can benefit automotive photographers. What are Clipping Path Services? Clipping path services are a photo editing technique used to separate an object from its background. A clipping path is essentially a vector path or shape that is created around the object to be extracted. Once the path is created, the object can be isolated and placed on a new background or used as a standalone image. Clipping path services are commonly used in automotive photography to remove unwanted backgrounds, add shadows, or adjust lighting. The Benefits of Clipping Path Services for Automotive Photography Perfectly Isolated Objects: Clipping path services allow automo

how to make Image Shadow Service

Image
  To create an image shadow service, you will need to use a photo editing software program such as Photoshop. There are a few different ways to create a shadow, but the most common method is to use the Drop Shadow effect . To use the Drop Shadow effect, follow these steps: Open the image in Photoshop. S elect the object that you want to add a shadow to. Click on the Layer Style menu and select Drop Shadow. In the D rop Shadow dialog box, adjust the settings to create the desired shadow effect. C lick OK to apply the shadow. Here are some tips for creating a realistic shadow: Make sure the shadow is the correct size and shape. The shadow should be the same size as the object and should be slightly blurred. Make sure the shadow is the correct color. The shadow should be a slightly darker version of the object's color. Make sure the shadow is in the correct position. The shadow should be below the object and should be slightly offset from the object. With a little practice, you ca

jewelry retouching image editing in photoshop

Image
Here are the steps on how to retouch jewelry photos in Photoshop: Open the jewelry photo in Photoshop. Use the Spot Healing Brush Tool to remove any dust or scratches from the photo. Use the Clone Stamp Tool to copy pixels from one area of the photo to another, such as if there is a glare or reflection on the jewelry. Use the Healing Brush Tool to blend two different areas of the photo together, such as if there is a seam between two pieces of jewelry. Use the Adjustment Layers to adjust the color, brightness, and contrast of the photo. Use the Masking Tools to hide or reveal certain parts of the photo, such as if you want to remove a background or other unwanted elements. Save your work. Here are some tips for retouching jewelry photos in Photoshop: Start with a high-quality photo. The better the quality of the original photo, the easier it will be to retouch. Use a light touch. It's easy to overdo it when retouching photos, so be careful not to make the changes too drastic. Use

Today we will see which one is better among better methods, AI Background Remove and Hand Clipping Path Background Remove.

Image
 Both AI Background Removal and Hand Clipping Path Background Removal are effective methods for removing the background from an image. However, they have different strengths and weaknesses, and the best method for a particular image depends on various factors such as the complexity of the image and the desired level of accuracy. I will provide you with the image and link so that you can check it or you can check it with any image . Here are some images of this background remover as an example:  AI Background Removal This is grammar and is never perfect Judge for yourself if the background is properly removed. AI Background Removal is a newer technology that uses machine learning algorithms to automatically identify the foreground and background of an image and remove the background. This method is generally faster and requires less manual intervention than hand clipping path background removal. Additionally, AI Background Removal can handle complex images with irregular shapes and fine